Sunday, September 9, 2012

How To Create Windows 7,Vista,XP Multi Bootable DVD

Download SARDU From http://www.sarducd.it

Step 1
To Prepare iso file from your bootable cd/dvd and save iso file in your local drive

Step2
Rename Your Windows 7 iso To new Name---->As Below Given


Rename Rules
for Windows 7 iso replace this name---->installwin7*.iso


Rename Your Windows vista iso To new Name---->As Below Given
Rename Rules
for Windows vista iso replace this name---->installvista*.iso

Rename Your Windows xp iso To new Name---->As Below Given
Different Version of xp(x64 and x86,Home Version and Pro)

Rename Rules
Windows xp Home(x86)---->Install_XP_home.iso
Windows xp Pro(x86)---->Install_XP_pro.iso
Windows xp Any Version(x64)---->Install_XP_x64.iso

If you want to use wildcard for same version of windows ie if you want to create windows vista(x86) and windows vista(x64) + windows 7 multiboot DVD you can assign * and replace with any charactor For this Example You can do Given Below 
Windows vista(x86) iso replace this name---->installvista_86.iso 
Windows vista(x64) iso replace this name---->installvista_64.iso 
Windows 7 iso replace this name---->installwin7.iso 
Windows xp Home(x86)---->Install_XP_home.iso 
Windows xp Pro(x86)---->Install_XP_pro.iso 
Windows xp Any Version(x64)---->Install_XP_x64.iso


Step 3
Download SARDU From(Multi/Dual Boot iso Creator) http://www.sarducd.it

It's Zip File So you don't need to install it so Extract it your drive which contain More Than 10GB HDD Space because you need to put your iso file later which contain more than 3 or 5 GB space
Step 4
Paste Your iso file in ISO Folder As Given Below screenshot
Step 5
SARDU.EXE
Screenshots of SARDU
SARDU Default in Antivirus Tab
Step 6
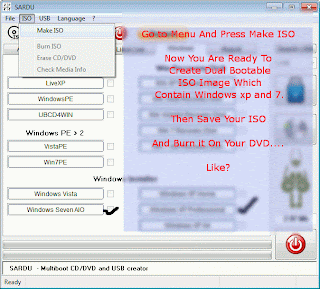
Then press Windows Section given Below screenshots

Step7
Then press Windows Tab given Below screenshot
And Then check the box windows vista windows xp and windows 7 box


Step8 (Final Step...!)


Thursday, May 31, 2012

Samsung Launches Galaxy S III in India

Samsung on Thursday launched its flagship Galaxy S III smartphone in India, according to reports.
The latest release in the Galaxy lineup is priced at 43,180 Indian rupees, or $768, The Wall Street Journal reported. India is one of Samsung's top three strategic markets, after the U.S. and Europe.
Samsung intends to grab a 60 percent share of India's smartphone market this year. Last year, the South

Sunday, May 27, 2012

Aged Windows XP costs 5x more to manage than Windows 7

Computerworld - Microsoft yesterday added ammunition to its increasingly aggressive battle to get users off the nearly-11-year-old Windows XP by citing a company-sponsored report that claims annual support costs for the older OS are more than five times that of Windows 7.
Microsoft has been banging the Windows XP upgrade drum for years, but stepped up the campaign in 2012, including starting a "two-year countdown" to the demise of security support. Last month, Microsoft was blunt, saying "If your organization has not started the migration to a modern PC, you are late."
Windows XP exits all support, including monthly security patches, in April 2014.
In a blog post Thursday, Erwin Visser, a senior director for Windows, used data collected by IDC to make Microsoft's upgrade case.

"The bottom line...[is that] businesses that migrate from Windows XP to Windows 7 will see significant return on investment," said Visser.
Microsoft sponsored the survey conducted by IDC, which in turn interviewed nine enterprises or large organizations to drill into the

Friday, May 11, 2012

Make Your Windows XP Run Faster Than Never Before

These are some tricks that make use of programs listed in this guide and nothing will happen even if you go.

DISABLE INDEXING SERVICES

Indexing Services is a small little program that uses large amounts of RAM and can often make a computer endlessly loud and noisy. This system process indexes and updates lists of all the files that are on your computer. It does this so that when you do a search for something on your computer, it will search faster by scanning the index lists. If you don’t search your computer often, or even if you do search often, this system service is completely unnecessary. To disable do the following:
1. Go to Start
2. Click Settings
3. Click Control Panel
4. Double-click Add/Remove Programs
5. Click the Add/Remove Window Components
6. Uncheck the Indexing services
7. Click Next

OPTIMISE DISPLAY SETTINGS

Windows XP can look sexy but displaying all the visual items can waste system resources. To optimise:
1.Go to Start
2. Click Settings
3. Click Control Panel
4. Click System
5. Click Advanced

Tuesday, March 27, 2012

Tablets that support 23 Indian languages launched

Wishtel, a Mumbai-based company, last week launched two tablet PCs, Ira and Ira Thing, which support 23 Indian languages.
The seven-inch portable devices run on Taiwanese chipmaker VIA Technology's 800 MHz processor and operate on the Google Android ecosystem. While Ira sports a TFT LCD resistive touch screen, 256 MB RAM and 2GB of storage, the top-of-line Ira Thing features a

Saturday, March 17, 2012

LELTHANG: SBI Online – 9500 Clerks (Assistant & Stenographer...

LELTHANG: SBI Online – 9500 Clerks (Assistant & Stenographer...: SBI Online – 9500 Clerks (Assistant & Stenographer) Vacancies Recruitment 2012:  State Bank of India has modified the clerical recruitmen...

Thursday, February 16, 2012

How to Connect an External Tv Tuner Card to Your Desktop

In this article, we will learn how to connect an external Television tuner card to your desktop, such that when you power on the tuner card, you can watch TV and when you power it off, you are back to your normal desktop (running any operating system)

Steps

  1. 1
    Open up the box packing the TV tuner card, its remote and a few cables.
  2. 2
    Plug out the speaker jack from your sound-card (which is usually located at the back of the CPU cabinet).
  3. 3
    Insert the cable(which has a similar jack like your speaker's jack that was plugged into the sound card) that came along with the packaging in the place of the speaker jack into your sound card.
  4. 4
    The other end of this cable should be plugged into the "Sound-out" socket of the TV tuner card.
  5. 5
    The speaker jack should be plugged into the "Sound-In" socket of the TV tuner card.
  6. 6
    Plug out the monitor display cable from the back of the CPU cabinet and plug it into the TV tuner card. The socket on the card looks similar to the one on the CPU cabinet.
  7. 7
    Now, take the other cable that had come bundled with the tuner card and plug one of its end into the monitor socket on the CPU cabinet.(The plug looks similar to the plug on your monitor cable).
  8. 8
    Plug the other end of this cable into the "VGA-Out" socket of the tuner card.
  9. 9
    Take the power adapter that came bundled with the card and plug it into a power source.
  10. 10
    The output cable of the power adapter needs to be plugged into the "Power-In" socket of the tuner card.
  11. 11
    Insert the terrestrial antenna jack into the antenna socket of the card.
  12. 12
    Switch on the entire setup. (In some cases, you could hear a beeping sound from the speakers).
  13. 13
    Use the remote control bundled with the card and make sure it has proper batteries in it.
  14. 14
    Press the power button and the desktop monitor should show some display resembling a disturbed TV transmission.
  15. 15
    Treat the setup like a regular TV and tune the channels.
  16. 16
    Turn the TV off, and you can continue working on your desktop normally.

Sunday, February 5, 2012

Disable Error Reporting in XP, Vista, and Windows 7

Disable Error Reporting in XP, Vista, and Windows 7

When you’re trying to fix a computer or are setting it up for certain functionality for a business, it can be quite annoying always getting error messages when you know what your doing. Today we take a look at disabling those messages in XP, Vista, and Windows 7.
Note: Error Reporting can be valuable if Windows isn’t working correctly and shouldn’t be disabled unless you’re a system admin or power user. This is not recommended for the average home user. 
sshot-2009-12-19-[23-57-18]
Error Reporting is enabled by default on XP, Vista, and Windows 7. If an error occurs, a detailed message regarding the error pops up and you’re prompted to send the information to Microsoft. This is so they can gather error info from millions of PC’s and helps them create patches and Service Packs. In some cases it will check the error and provide solutions to fix it. When you’re setting up a machine for specific functionality, the messages get very annoying. There are a number of reasons why an experienced user or tech would want to turn them off, so lets begin.
Disable Error Reporting in Windows 7
Open up the start menu and type in problem reporting settings into the search box, or head to Action Center –> Change Action Center Settings –> Problem Reporting Settings. If you used the search, use the “Choose how to report problems” item in the list:
Then you can easily choose the option from the list:
Again, you probably should leave it enabled, but this will let you disable it.
Disable Error Reporting in Windows 7 with Group Policy
Note: This method used Local Group Policy Editor which isn’t available in Home versions of Windows 7.
Click on Start and enter gpedit.msc into the search box and hit Enter.
Local Group Policy Editor opens and you want to navigate to User Configuration \ Administrative Templates \ Windows Components \ Windows Error Reporting and under Setting double click on Disable Windows Error Reporting.
 
Change it from Not Configured to Enabled, then click Apply and Ok and close out of Local Group Policy Editor.
Disable Error Reporting in Vista
To disable Error Reporting in Vista click on Start and open Control Panel.
Make sure you’re in Classic View and double click on Problem Reports and Solutions.
Under Tasks click on the Change Settings link.
 
It’s worth noting here that if you choose Ask me to check if a problem occurs, error reporting is enabled but you get to choose whether or not to send the diagnostics to Microsoft. If you select Check for solutions automatically (recommended) then all data will be sent to Microsoft automatically. Since we want to disable it all together, click on theAdvanced Settings link.
In the next screen under For my programs, problem reporting is…select Off then click Ok to close out of the Problem Reports and Solutions window.
 
Next you’ll see that everything under Choose how to check for solutions to computer problems is grayed out. Click Ok to close out of this screen.
Click Close on the message telling you that Error Reporting is turned off.
Disable Error Reporting in XP
To disable error reporting in XP right click on My computer and select Properties. In theSystem Properties window click the Advanced tab then the Error Reporting button.
The Error Reporting window comes up where you want to select Disable error reporting. Uncheck the box But notify me when critical error occur if you don’t want to see any errors at all then click Ok and Ok to close out of the System Properties window.
Conclusion
When you’re setting up a computer for a set of users in a company, chances are the settings will pop up error messages that you already know about, and this takes up time to click out of them. With error reporting turned off, experienced users can go about their business without being annoyed constantly. A couple of other suggestions to eliminate other annoyances is to disable Program Compatibility Assistant and disabling the delete confirmation dialog as well. So far I haven’t noticed as many errors in Windows 7 as Vista, and they seemed to be a regular occurrence on XP. Disabling Error Reporting allows the experienced user to save time by not having to constantly clicking out of them.