Sunday, November 13, 2011

Slow Boot Up... Guide to a fast startup


No more Slow Boot Up...
Guide to a fast startup!

Suffering from a slow boot up in your new or old computer? Don't worry most people's computer take forever to startup. However, the way you go about repair this problem can cost you very little or a whole lot. Most people quickly start looking for affordable hardware solution such as faster hard drives, more RAM, or even a new processor. However, if you have hundreds of dollars of spare cash laying around be my guest. However, you can perform a few tweaks and maybe invest in a registry cleaner to get you up in running as quickly as possible. 

No, if your computer slow boot up is in response to error located in your registry you will have to individually search them out or using a registry cleaner. Your registry is your computer's largest filing system. During startup your computer must search through the thousand of registry files. If you have errors, it may check and attempt to repair the problem during startup. This creates a delay and adds immensely to your slow boot up problem. Check out the link below if you are receiving errors during the startup process or get a registry cleaner to do the work for you. The page will give you tips on both. Stop slow boot up problems by organizing and repairing the registry. Click here to learn more!

TWEAK YOUR BIOS

When your computer has slow boot, it may have nothing to do with Windows at all. There is a Basic Input/Output System known as the BIOS. The BIOS runs at the startup sequence where it configures devices and then boots the operating system. However, if the configuration is messy and has some obscure commands, this will cause a slow boot up. Depending on your mother board manufacturer, you may have the access the BIOS differently. 
1. Turn on your computer, and hold down delete.
2. In the BIOS window, look for the Boot Menu option.
3. Choose the QUICK BOOT to turn off memory test
.4. Make sure the hard drive comes first in the BOOT ORDER.
5. Turn off any logo displays.
6. Restart
Tweak your BIOS to stop slow boot up


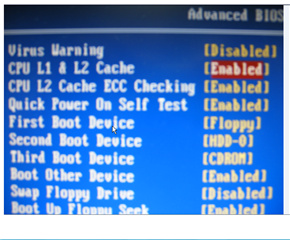
This is an example of a BIOS that will cause a very slow boot up. Follow the advice above to streamline your BIOS to load your configuration a quick as possible.
Disable ON BOARD sound and GRAPHICS
Only do this if you have an third party sound and graphic card already installed.

1. In the BIOS menu, select Onboard Device or Integrated peripherals.
2. Disable the onboard chips and turn off unused network adaters.
3. Restart


BOOT MENU Default Settings

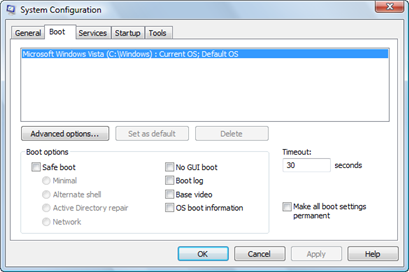
If you are using XP or Vista, you have a this. You can access the boot menu by loading your MSCONFIG. During the boot up your computer issues a time out to find new hardware and software. You can short this time to boost your startup speed.
1. Open your Start menu.
2. Click Run
3. In the command screen type msconfig
4. In the system configuration utility,click either BOOT tab.
5.In the boot menu, change the default setting for Time Out from 30 to 5 seconds.
stop slow boot up problems by tweaking your boot menu


Eliminate Boot Up Passwords.

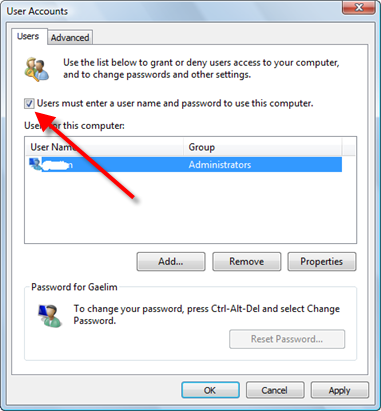
Having a password lock computer can add to your slow boot up. The operating system must completely halt the boot up to allow you to type in your text based password. Eliminating this boot password option will give you a welcome speed boost. 

1. Click the Start button.
2. In the Start Search bar, type control userpasswords2
3. Load the User Accounts window
4. Uncheck User must enter user name passwords...
5. Click Apply
No startup password will stop slow boot up problems


Kill Resources HOGS.

The Windows Defender options allow you to easily cut down on unnecessary programs that are loading on your PC. You can also use the Disk Cleanup options to before this task.

1.Click Start button and load the Control Panel
2. Under the Control Panel menu, click Programs.
3. Under the Windows Defender heading choose View currently running programs
4. Choose Startup Programs from the Category option
5. Remove Programs that you feel unnecessary for startup

stop slow boot with windows defender


Advanced Registry Tweaks

Once you have streamlined your startup program process, you should turn your attention to your computer's registry. Windows Registry needs to operate efficiently. If it is not organized and cleaned regularly, it will cause slow startup and shutdown problems. In addition, it will slow your computer performance down considerably. This occurs because you computer needs to search the registry constantly for software entries to know how to configure them for loading. Any error will cause you to ask why my computer is slow opening. To slim down your registry for better computer performance, Click here to see the leaders in registry cleaner field

Advance registry tweaks can stop slow boot up problems. But they are very dangerous. By stopping the index service from hunting files you get an added boost by shorting file names. However, only do this if you are always actively searching for files. 

1. Click Start
2. Click Run
3.Type regedit
4. Find this registry key:HKEY_LOCAL_MACHINE>SYSTEM>CurrentControl>SetControl>FileSystem
5. Set the NtfsDisable8dot3NameCreation to 1 to eliminate the extra creation of short version for DOS names.


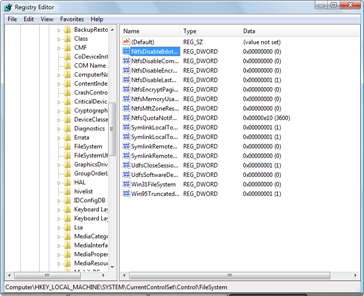
This tweak gives you an added speed boost by preventing your computer from making DOS style shorten version of the file names. This leaves less data in your registry. However, this may cause slowdown during searches.


Improve Your Hard Drive
Switch FAT to NTFS-- You can increase your hard drive speed by switching FAT to NTFS. The NTFS configurations provides increased security, file–by–file compression, quotas, and even encryption. The default setting for XP may be set to FAT which is slower system. However if you have already converted to the NTFS16 to NTFS32
How To:
1. Click Start
2.Click Run
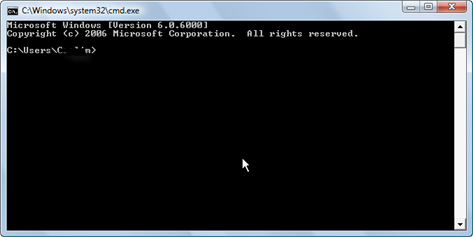
3. Type cmd press Enter.
4. At the command prompt
Type convert X:/FS:NTFS(X is your hard drive letter)
5. Hit Enter


Stop Slow boot up problems by changing the hard drive seetings


Disable the Indexing Service for faster booting-- The indexing service scans your hard drive and indexes files to help speed up searching. It runs silently in the background using up RAM, free space and CPU access time. It is generally thought to be unnecessary by most.
How to disable this indexing service
1. Click on Start
2. Click Run
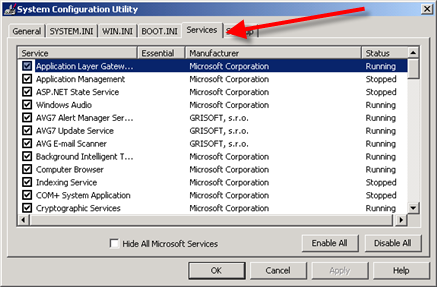
3. Type services.msc
4. Select Indexing Service and Double click on it.
Select Manual under Startup Type.
5. Click Stop
6. Click OK

Thursday, October 20, 2011

Windows 8 to offer new Metro-based search feature


Microsoft has revamped the Start screen's search feature in Windows 8, hoping to help users more easily find and view specific apps, settings, and files.
Like most features in Windows, search has evolved over the years.
In Windows 7, users can type the name of an item in the search field at the bottom of the Start Menu to locate programs and other files. But by default, the initial search results are limited to what can fit in the window, forcing users to click on a link to see more results in a full window. The results also show files from a range of categories, including applications, documents, music, images, e-mail messages, contacts, and even Control Panel settings.
In Windows 8, Microsoft has endeavored to both enhance and streamline the Start screen's search feature, according to the latest edition of the Building Windows 8 blog written by Brian Uphoff, a program manager on Microsoft's Search,

Tuesday, October 11, 2011

Apple releases iTunes 10.5 with iTunes in the Cloud, WiFi sync support

iTunes 10.5 is officially available to the public ahead of Wednesday's launch of iCloud and iOS 5. The release is required for users who want to make use of iOS 5 features like iTunes in the Cloud and wireless syncing via WiFi, and is available via Software Update for both Windows and Mac users.
According to Apple's release notes, there are only a few major features that come with iTunes 10.5. The first is iTunes in the Cloud support, which not only allows you to re-download previous music, TV, movie, and book purchases on your iOS devices, but also allows your other devices to automatically download that media when you buy it. 
This, plus the wireless WiFi syncing for iOS devices, makes up the bulk of the 10.5 update (we also hear iTunes Match is included, but we're still downloading), though users who don't plan to make use of those features will still want to upgrade if they want to update their devices to iOS 5 when it becomes available. It's also worth noting that the iTunes 10.5 update for Windows 7, Vista, and XP SP2 also comes with a handful ofsecurity updates, so it's likely worth upgrading if only for improved security protections, too.

Monday, August 29, 2011

Convert your mobile into a universal remote

Ever wanted to use your smartphone or tablet to control various home appliances or start your car like they show in the movies? Read on to find about the various free apps and systems available today that allow your smartphone to work as a universal remote control. 

REMOTELY CONTROL YOUR HOME 

Crestron is one of the leading brands for home automation. Although each installation usually comes with its own universal remote control, Crestron also provides apps for iOS and Android devices. These apps connect to the Crestron system using Wi-Fi (for seamless access anywhere) and allow you to remotely control any home appliances or gizmos that are wired into the system. Plus, you need not be

Tuesday, July 26, 2011

Restore the Show Desktop icon to Quick Launch bar in Windows XP and Windows Vista

For Windows Vista

Download ShowDesktop.zip and save to Desktop. Unzip the archive and move the file Shows Desktop.lnk to the Quick Launch folder which is located here:
%Appdata%\Microsoft\Internet Explorer\Quick Launch
To quickly access the Quick Launch folder, type shell:Quick Launch in Start, Search box and press {ENTER}.

For Windows XP

The Show Desktop icon can be restored using any of these methods:

Method 1: Using Guided Help to re-create the Show Desktop icon

Here are the screenshots of Guided Help.

Method 2: Manually re-create the Show Desktop icon

Click Start, Run, and type Notepad.exe. Copy the following contents to Notepad.
[Shell]
Command=2
IconFile=explorer.exe,3
[Taskbar]
Command=ToggleDesktop
Save the file as "Show Desktop.scf" (with quotes, in order to prevent Notepad from appending .txt extension). Now, drag the file to the Quick Launch Toolbar.

Method 3: Using the Regsvr32 command

Click Start, Run and type the following command:
regsvr32 /n /i:U shell32.dll
The Show Desktop icon file should be available now.

Method 4: Copy the file from another user account

Every user account will have a copy of Show Desktop.scf file. Search for the file named Show Desktop.scf in your computer by logging in as administrator. Copy it to your user profile path here:
%Appdata%\Microsoft\Internet Explorer\Quick Launch
(Type the above path in StartRun dialog)

Tuesday, July 19, 2011

25 Cool Windows 7 Keyboard Tricks That Will Impress Your Friends


Anyone working professionally with a computer has their hands on the keyboard most of the time. Reaching for the mouse can be an annoying disturbance and personally I often turn over my mouse in such situations. An easy solution is to simply keep the hands on the keyboard and complete as many tasks as possible with keyboard shortcuts only.
Apart from making you work more efficiently and faster, you can also impress your friends or colleagues by being able to work without a mouse. This article describes some cool Windows 7 keyboard tricks to get you started. In the end you might never want to take your hands off the keyboard again.

For your convenience, more keyboard shortcut resources are attached at the bottom.
Note that some of these shortcuts will only work if Windows Aero is enabled. If Aero effects are disabled on your computer, it might not be powerful enough to support resource intensive graphical features. The visual effects may also have been disabled to increase overall performance. If you wish to enable Aero nevertheless, have a look at my recent article explaining How To Enable and Troubleshoot Aero Effects in Windows 7.

Aero Shortcuts

  • [Windows] + [Spacebar] (Aero Peek)
    Make all open windows transparent to view gadgets and icons on desktop.
    • [Windows] + [D] (Aero Peek)
      Show or hide the desktop.
    • [Windows] + [Home] (Aero Shake)
      Minimize all but selected window. Reverse by clicking the key combination again.
    • [Windows] + left arrow OR [Windows] + right arrow (Aero Snap)
      Dock selected window to the left or right half of your screen.
    • [Windows] + up arrow OR [Windows] + down arrow (Aero Snap)
      Maximized and restores the selected window.
    • [Windows] + [SHIFT] + up arrow OR [Windows] + [SHIFT] + down arrow (Aero Snap)
      Maximizes and restores selected window in vertical dimension only.
    • [Windows] + [Tab] (Aero Flip)
      Launch 3D representation of open windows and click [Tab] key again to flip through them.

    Windows & Taskbar

    • [Alt] + [Ctrl] + [Tag] + left/right/up/down arrow
      Flip window.
    • [Alt] + [Tab]
      Cycle through open windows.

    • [Windows] + [T] OR [Windows] + [SHIFT] + [T]
      Move focus to front or back of taskbar. Press [T] again while holding the [Windows] key to cycle through items in the taskbar from left to right or, with [SHIFT] button held too, from right to left.
    • [Windows] + [B]
      Puts focus on the ‘show hidden icons’ button on the system tray.
    • [Windows] + [1] THROUGH [Windows] + [9]
      Launch first through ninth icon on taskbar, including items pinned to taskbar.
    • [Windows] + [SHIFT] + [1] THROUGH [Windows] + [SHIFT] + [9]
      Starts new instance of respective taskbar icon.
    • [Windows] + [Ctrl] + [1] THROUGH [Windows] + [Ctrl] + [9]
      Cycles through multiple instances of the respective icon.
    • [Windows] + [Alt] + [1] THROUGH [Windows] + [Alt] + [9]
      Opens jump list for respective icon.
    fun keyboard tricks

    Multiple Monitors

    • [Windows] + [SHIFT] + right arrow OR [Windows] + [SHIFT] + left arrow
      Move selected window from one monitor to another. They will remain in the same relative location.
    • [Windows] + [P]
      Select presentation display mode.
    fun keyboard tricks

    Magnifier

    • [Windows] + [+] OR [Windows] + [-]
      Activates Windows Magnifier to zoom in or out of screen.
    • [Ctrl] + [Alt] + [D]
      Switch to docked mode.
    • [Ctrl] + [Alt] + [L]
      Switch to lense mode.
      • [Ctrl] + [Alt] + [F]
        Switch from docked or lens mode back to full screen mode.
      • [Ctrl] + [Alt] + [I]
        Invert colors.
      • [Windows] + [Esc]
        Exist magnifier views.

      Other

      • [Windows] + [G]
        Cycle through desktop gadgets.
      • [Windows] + [X]
        Launches Windows Mobility Center. Especially useful if you’re working on a laptop.

Friday, July 15, 2011

Facebook launches app for 'Every Phone'

Facebook is embracing the reality that not everyone is on a smartphone.
Consumers using standard mobile phones can now download the social network's Facebook for Every Phone app. According to the company, users will be able to see their News Feed, check for messages in their Inbox, and view photos. Users can also upload images and find friends from their contacts list.

Much of Facebook's growth can be attributed to mobile devices. The social network's co-founder and CEO, Mark Zuckerberg, said last week that the site now has 750 million active users. A whopping 250 million active users access the social network from their mobile platforms, according to Facebook's site, and those folks have proven to be "twice as active on Facebook than non-mobile users."

Although Facebook already offers smartphone applications for iOS and Android, among other platforms, its decision to embrace feature phones is a smart one, considering the sheer number of people who still aren't using a smartphone. According to a study released earlier this week by Pew Research Center, 83 percent of U.S. adults have a mobile phone, but only 42 percent of them have a smartphone. Just 35 percent of all American adults have a smartphone.
For Facebook, a key limitation of feature phones is that most consumers don't typically pay for data on those platforms. And the social network's app requires data to function. Facebook acknowledged that reality in its blog post announcing the new app, and said that it has partnered with a host of carriers around the world to offer users free data for 90 days to address that problem.

Surprisingly, Facebook did not include any U.S.-based carriers in its list of companies providing free data. The social network did not immediately respond to request for comment on whether or not the free-data offer is being extended to folks in the U.S.

According to Facebook, its app is available on more than 2,500 mobile phones. People interested in using the app can surf to the company's mobile page, scroll to the bottom, and click the download link. It's also available in app stores GetJar, Appia, and Mobile Weaver.

Tuesday, July 12, 2011

For a Safer, faster XP Close Unwanted Service

To disable unneeded startup services for a safer, faster XP, use the "Services" Admin Tool (Control Panel > Administrative Tools > Services). If you are a single user of a non-networked machine, you can disable the following items, with no ill effect. 


Alerter
Clipbook
Computer Browser
Fast User Switching
Human Interface Access Devices
Indexing Service (Slows the hard drive down)
Messenger
Net Logon (unnecessary unless networked on a Domain)
Netmeeting Remote Desktop Sharing (disabled for extra security)
Remote Desktop Help Session Manager (disabled for extra security)
Remote Procedure Call Locator
Remote Registry (disabled for extra security)
Routing & Remote Access (disabled for extra security)
Server
SSDP Discovery Service (this is for the utterly pointless "Universal P'n'P", & leaves TCP Port 5000 wide open)
TCP/IP NetBIOS Helper
Telnet (disabled for extra security)
Universal Plug and Play Device Host
Upload Manager
Windows Time
Wireless Zero Configuration (for wireless networks)
Workstation 

Monday, July 11, 2011

Toshiba develops the smallest 8MP CMOS image sensor in the world

Toshiba has announced it has developed a new type of CMOS image sensor, which it claims has the smallest level pixel size in the industry, at 1.12 micrometers. This is great news for squeezing in high-quality camera sensors in a small area, as is most required these days for mobile phones and other portable devices with a miniaturized camera onboard.

The new super-thin and small CMOS image sensor shown off was 8.08MP in resolution, and measured just 0.25-inches in size. The sensor also comes with backside illumination sensors (BSI), built right onto the silicon substrate, acting as lenses on the rear of the sensor. This enhances the light sensitivity and absorption, imaging performance, and responsiveness of the sensor, making it suitable for capturing fast moving objects and video capture as well.
Expect to see Toshiba’s new CMOS image sensor with BSI in devices by next year, as they will begin sampling it now, and mass produce it in the end of 2011.